Thanks to Blogger's handy little Statistics feature, I've just found out that I have accumulated 3,000 page views!!!
Although that might not seem much to some people, it's a lot to me, considering this blog has only been up since the 8th of January.
So, this is a quick post to say thanks to my followers and everyone that reads my blog =D
PS. If you're not following my blog, GET FOLLOWING!!!
Tuesday, 16 April 2013
Thursday, 11 April 2013
Four To Square and Pack-Man
 |
| Four To Square |
Regardless, I managed to grab a few inexpensive puzzles, both of which are packing puzzles, which I'm writing about today.
I read about both these puzzles on my fellow blogger's sites and contacted the makers, who just so happened to have some to send me.
Friday, 15 March 2013
Remove The Yolk
I haven't blogged in a while and, to be honest, I haven't really picked up a puzzle in a while.
So I thought I'd change that!!
This is a blog post about the latest puzzle I opened, albeit a week or two ago now.
 |
| Remove The Yolk |
I've had my eye out for one for a while now, but they aren't made anymore so I thought my chances were slim. Luck must have been on my side!! You may remember I reviewed two of Robrecht's puzzles a while back, the 1 Euro Labyrinth and the 4 Steps Visible Lock and I loved both of those and I heard this one was a toughie. Naturally I jumped at the chance to get one.
Saturday, 2 March 2013
Jerry Loo's Ball In Cylinder
Unfortunately this blog post isn't the second part to my latest Eric Fuller Package because I still haven't completed them both yet (or even one of them!!), so that one will have to wait.
In the mean time, I thought I'd review another puzzle I received from a fellow puzzle blogger, recently turned puzzle designer, by the name of Jerry Loo.
 |
| RevoLUTION Ball Puzzle (Image courtesy of Jerry Loo) |
When I first started puzzling and joined the Revomaze forum, Jerry would pop up occasionally to offer encouragement to anyone that needed it. I then realised that several of the guys on the forum had blog which naturally led me to Jerry's Small Puzzle Collection blog.
It was from there (and a few posts on the Revomaze forum) that I discovered Jerry's new found calling as a puzzle designer, in the form of his RevoLUTION Ball Puzzle. Designing a puzzle is easy (for some people, not me!!), but actually having one made that works is a great achievement.
But Jerry wasn't going to stop there. Shortly after he had began working on another idea and very soon he had another working prototype, called the Ball in Cylinder.
Tuesday, 26 February 2013
Eric Fuller Package: Part I
I haven't blogged in a while. The main reason for this is the abundance of puzzles that have landed on my doorstep. In total, since my last blog post, I have received a total of 17 puzzles!!! (and I'm still waiting on one more!). They are made up of a large shipment from Mr Puzzle in Australia, several auctions I have won recently and puzzles that have just been recently made (one from a fellow blogger!!). But now I have 10 days off work, I should be able to solve a great deal of them and knock out several reviews while I'm at it.
 |
| The latest shipment from Eric Fuller |
The ones I'll be reviewing today are the ones I've recently solved from Eric Fuller, a brilliant craftsman from America. I reviewed two other burrs from Eric a while back, the Burr Circus and the Uranus, so check that one out if you haven't already.
These two burrs then are from his latest batch of puzzles made this month, from his website Cubic Dissection. I bought four of them in total, but the other two I haven't completed yet, so I'll review those later ... plus it breaks down the blog post nicely!! (hence the "Part I").
Monday, 11 February 2013
Midlands Puzzle Party 9 (MPP9) 09/02/13
I've been on the Revomaze Forum since March 2011. Since then I slowly got more and more interested in puzzles and last year (2012) I properly started collecting puzzles. I also kept reading about this Midlands Puzzle Party and looking at all the pictures people have posted on the forum and their own blogs.
Unfortunately for me, because I work nights, it has been difficult for me to get the time off to go, as it's always held on Saturdays. However, this time I managed to shift a few holidays around and actually get there and I'm glad I did!!!
First I must apologise for lack of pictures. I was too busy playing with all the wonderful puzzles to stop and take pictures and before I knew it people began leaving and then it was time for me also to trek back home!!
First I must apologise for lack of pictures. I was too busy playing with all the wonderful puzzles to stop and take pictures and before I knew it people began leaving and then it was time for me also to trek back home!!
The party was held at The Gap Community Centre in Warwick, which is about a two hour drive for me. But the drive was good, no real problems there, apart from the little snow storm which I had already expected. I actually arrived earlier than I expected to (without breaking speed limits, of course!!) but luckily Nigel, the event organiser, Chris and Bruce were already there setting up. After the brief introductions, we all carried on unpacking as several more turned up.
One of these was a quite a strange character, who later turned out to be "The B*****d" of the group, Allard!!! I had already sort of gathered that from the Revomaze forum but I quickly experienced it first hand when he questioned why I didn't have a puzzle in my hand, promptly handing me a piece from his prized Stickman collection. By the way, he's the one that "pays" people to dismantle puzzles that they know they won't be able to put back together themselves and then offers no hints to help them reassemble them!! Fortunately, the Stickman he gave me was the easy one, the Chopstick Box, which I must say is brilliantly simple and very elegant. His other Stickmans were beautiful and I daren't touch them knowing how much they cost!!
Wednesday, 6 February 2013
Wil's First Box
This is another review of one of Wil Strijbos' sequential discovery puzzles, like the Lotus Puzzle that I reviewed not so long ago.
It is called the First Box, which obviously means it's the first box puzzle Wil designed:
"I designed this puzzle around 1984 and it was my first puzzle box. At that time I produced only six of them (for Jerry Slocum, Nob Yoshigahara, Dick Hess, Edward Hordern and James Dalgety). Now I have reproduced this design in an improved metal version (previously it had been made of Formica or a similar material)." - Wil
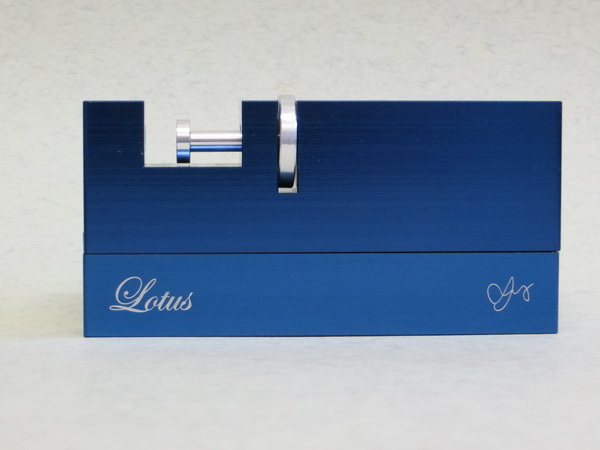
 |
| Wil's First Box |
This redesign is made completely out of Aluminium and is anodised in Wil's trademark blue with his signature in one corner. The box itself is quite weighty (in fact it weighs about 745g!!), which kindly suggests there isn't a lot of space inside. Shaking it, you can hear a few things rattling but it's difficult to tell exactly how many. There is a rounded nut on the top, one hole in the left side and a hole in the bottom. Because of this, one of my mates expertly resembled it to a "Fat Tardis"!! Through the hole in the bottom you can see a smiley face (sad face actually!!) that you've helpfully been told that you have to remove. Other than that, there is nothing else to this puzzle .... EASY, right!?!
As is with all of Wil's puzzles, no magnets, no banging, no external tools (or power tools!!) and no force in any way, is needed to open this box!!
The only concern he had with the first version of the first box (first first box!?!) was that it came with a separate tool. Since the redesign, he's found a nice little solution to overcome that.
Saturday, 2 February 2013
Hanayama Cast Quartet
The Hanayama Cast series of puzzles seem to be the most common puzzles around. At least for me, the first I came across (not knowing it at the time!!) was the Cast Elk, which I got out of a Christmas cracker many many years ago. However, it seems to have been misplaced with all the rearranging and such so I cannot tell if it was an actual Hanayama piece or a replica.
Anywho, because the Hanayama puzzles are Cast puzzles (liquid metal poured into a mould) they are inexpensive to make and are therefore equally inexpensive to sell. For that reason they make great stocking fillers and little gifts at Christmas. They can be found on Amazon for about £10.
This one, the Cast Quartet, I received from my Auntie (along with Nightmare Before Christmas on Blu-Ray!!). I also received the Cast Vortex from my parents, which I'll review in due course.
Having received the Quartet at Christmas, with family all watching, I was eager to get it out of its box and promptly solve it in front of them. However, because this is a Level 6 (Starred) difficulty puzzle which is "Very Hard", that might have been a bit optimistic on my part.
 |
| Hanayama Cast Quartet |
The Quartet is made up of four square shaped pieces with gaps in one corner. These gaps allow all the pieces to be interlinked and produce the final shape of two linked solid squares. Upon closer inspection, the two pieces that create one square have slightly different shaped pieces than the other two pieces that make the second square. To differentiate these pairs there are pieces labelled "(C)Hanayama" and "Quartet".
I then proceeded to spend the rest of the day, the couple of hours before dinner and the rest of the evening, avoiding conversation and instead puzzling with the Quartet. To no avail, may I add!!
Tuesday, 29 January 2013
Wil Strijbos' Lotus Puzzle
 |
| Yen Puzzle (Image Courtesy of Wil Strijbos) |
This is a review on Wil Strijbos' latest creation, based on a prototype he circulated at one of the Midlands Puzzle Parties (MPP) last year.
This first iteration was called the Yen Puzzle, as it was simply a One Yen coin held by a nail in a block of wood. The aim of course was to relieve the One Yen from its captor, the nail.
Since then Wil has revised this idea and added more tricks to it, thus inventing the aptly named Lotus Puzzle, which he released just before Christmas.
 |
| Lotus Puzzle (Image courtesy of Wil Stribos) |
Friday, 25 January 2013
Three Burrs from Greg Benedetti (Blind Burr, Glued, Odd Repartition)
 |
| Odd Repartition, Glued and Blind Burr |
Right, another review on burrs, strangely addicted to them at the moment!!!
Two of these I acquired on the Puzzle Paradise auction website, however I just "Bought Now" instead of actually winning the auctions!! The third, I to mention to Greg whilst sorting out my order and he happened to have a couple prototypes left!!
They are all designed by Gregory Benedetti and made by Maurice Vigouroux, apart from Glued, which Greg made himself.
Thursday, 24 January 2013
Two Burrs from Eric Fuller (Burr Circus and Uranus)
 |
| Burr Circus and Uranus |
So I've taken a break from puzzling to bring you all another review. This review is on an increasing addiction of mine (don't worry, it's still puzzling!!) but rather a type of puzzle, Burrs.
Burr puzzles are interlocking puzzles and are so called because their finished shape resembles a seed burr, apparently!! The usual six piece burr has a distinct shape with three sets of two cuboids, side by side, interlocking in all the three dimensions.
Anywho, although you may see lots of these burr puzzles around, they are each a lot different (apart from possibly the cheaper mass produced ones).
Rubenking Ghost Cube
Time for my first "twisty puzzle" review. (Finally got this finished after getting distracted with more new puzzles arriving!!!!)
Technically, the Rubik's Cube is what first got me into puzzling. My parents were clearing out one day and came across an original "Toy of the Year 1980" Rubik's Cube still in its plastic cylindrical box. Of course, being me, I snapped this up and started playing with it. This must have been about six years ago now, when I'd just left Secondary School and was starting Sixth Form (11th grade to you American folk).
 |
| Rubenking Ghost Cube |
During Sixth Form I obviously had a lot of free periods, so I spent these playing with the Rubik's Cube. I did get a job at my local supermarket during that time, so wasn't just puzzling in my spare time. Eventually I worked out how to solve it all on my own, but I wanted to get faster. So a quick search on the internet and I came across some "speedcubing" algorithms, which I printed off and began learning. To this day, I've learnt about half of these algorithms which allow me to solve a normal Rubik's Cube in a little over a minute.
Monday, 14 January 2013
Wil's Cylinders
Time for my first double review and my first review of Wil Strijbos' own puzzles.
Firstly, I'd like to mention that Wil states that NO external tools or magnets are required, NO bashing, NO blowing and NO excessive force is needed to open any his puzzles. (and if you do try any of these techniques, take it from me, they don't work!!!)
Right, I'll start with a puzzle which is simply called the Aluminium Cylinder (or sometimes Wil's Cylinder) and is just that, a cylinder made out of aluminium!!
 |
| Aluminium Cylinder and Washer Cylinder |
Obviously there is slightly more to the puzzle than that, but not much more!!! Firstly, as you can see, the cylinder is made of two parts, the lid and the base. Secondly, the two parts are numbered. In my case the lid is 03 and the base is 10 (my only guess its that the former is the batch number and the latter is the puzzle number, but I may be wrong). Thirdly, once you pick up the puzzle you can hear things rattling inside, but how many 'things'?? Lastly there is a small hole in the bottom of the base, which you may, or may not, be able to see these 'things', which turn out to be ball bearings (surprised?!), but you can't see enough to work out how many are in there.
Saturday, 12 January 2013
4 Step Visible Lock
Time for another review, hopefully this one won't require any post editing!!!
Again this puzzle is from my recent package from Wil Strijbos in the Netherlands. It was the first puzzle I played with out of the package and subsequently the first I completed.
It's called the 4 Step Visible Lock which is made by Robrecht Louage. I referenced this puzzle in my review of one of Rebrecht's other puzzles, the 1 Euro Labyrinth.
This puzzle was entered into the International Puzzle Party (IPP32) Design Competition in 2011 and won the Jury Grand Prize at the results event in Berlin, Germany. Therefore I had to get one and see what the fuss was about.
 |
| 4 Step Visible Lock |
The puzzle consists of a sliding piece of acrylic with grooves cut in which house several ball bearings. The grooves in the acrylic intersect with grooves cut in the Trespa base. This is the first time I've encountered the material known as Trespa. Apparently it's composed of Kraft paper, which is bound with a resin, then subjected to extreme pressure to create this high-pressure laminate. Anyway, I digress. Once again, the aim is to navigate these ball bearings round the grooves and ultimately release the 1 Euro coin through a hole cut in the top acrylic layer.
Friday, 11 January 2013
Melting Block
Time for another review I guess!!
This review is on another puzzle in my latest package from Wil Strijbos in the Netherlands. It is definitely one of my favourite puzzles so far in my collection as its a seemingly impossible puzzle with no hidden tricks, truly a mind-boggler!!!
It's called the Melting Block and it's designed by Tom O'Beirne, though I'm not sure who made my copy.
 |
| Melting Block |
It consists simply of a box, made out of Oak, and nine differently sized cuboids. At the start of the puzzle, one Mahogany cuboid is located on the lid of the box, which also helps to remove the lid!! The aim of the puzzle is to 'melt' this block into the box, obviously so the lid can still be closed!!
Upon removing the lid you find the other eight cuboids neatly packed into the box with no obvious gaps visible on the top layer. So you automatically think "Ok, there must be some gaps on the bottom layer".
At this point most people either tip the box upside-down to remove the cuboids or take out the top layer piece by piece, both ultimately reveal no such gaps on the bottom layer either.
Wednesday, 9 January 2013
1 Euro Labyrinth
Right, so I guess I should write a proper review. So here it is ...... after I give you a brief low-down on how I came about this puzzle (and quite a few of the other puzzles I'll be reviewing!!).
The first puzzle I'll be reviewing I received in my latest package from my puzzle contact in the Netherlands, William Strijbos. I found out about Wil from the friendly guys on the Revomaze forum, which is another set of puzzles I'll review in due course. Wil often goes on trips around the world and picks up many puzzles that he compiles into a newsletter which he sends to everyone on his mailing list. He also makes his own puzzles and has been given permission to reproduce some others. So as you can expect, his updates aren't sparse.
So far I have purchased puzzles from Wil three times and I've been on his mailing list since the 1st of October. There's no doubt that I'll continue to buy puzzles from Wil as he is a great businessman and produces some great puzzles.
So I thought I start with the puzzle I've most recently completed, the 1 Euro Labyrinth. It's a puzzle designed and made by Robrecht Louage. The puzzle was entered into Nob Yoshigahara's Puzzle Design Competition 2012 which was judged at the IPP32 held in Washington DC.
 |
| 1 Euro Labyrinth |
The puzzle consists of a clear piece of acrylic with a 1 Euro coin embedded, which can be seen through a keyhole shaped hole in the main body of the puzzle. Several horizontal grooves can also be seen through keyhole milled into the base and a single vertical groove in the piece of acrylic. Simply, the goal is to remove the 1 Euro.
So, you begin playing and you eventually see a small ball bearing in the vertical groove and it's obvious you need to navigate the ball bearing round the labyrinth inside which will eventually release the 1 Euro ..... however, it's easier said than done.
Tuesday, 8 January 2013
I started a blog!!!
Ok, so I've just started a blog.
Over time, this will become a collection of my puzzles and other puzzling things I collect over the years.
I guess that's it for now
That's all folks!!!
Over time, this will become a collection of my puzzles and other puzzling things I collect over the years.
I guess that's it for now
That's all folks!!!
Subscribe to:
Posts (Atom)